Saturday, June 30, 2012

Fourth of July Newborn Beanie

Good morning!

I dug out my basket of cotton yarn and played yesterday. I had a really good time thinking of what colors to use and what patterns to make.


Cotton Sun Hat for NB-3 months 13" wide and 5.5" deep

K hook, Lily Sugar and Cream Yarn, Slipstitch, Chain 2 at the end of each row.

Row 1: 10DC in a magic circle(10)
Row two: *4 DC in same stitch as chain. skip two stitches*. Repeat * to * 4 more times. (20) 
Row 3: DC around increasing every over stitch (30)
Row 4: DC around increasing every 3rd stitch (40)
Row 5-8: DC around (40), 
Change to J Hook, Slip stitch, ch 1
Row 9. SC around (40) fasten off


I cut out a star from some blue felt and hand sewed it on the hat using crossstitch thread and a metal embroidery needle. I used to glue felt on my hats, but the corners raised up. Now I sew everything on. 


Pickles

We adopted a dog two weeks ago at the local shelter here in Riverside, California. I had taken my husband and the boys several times and we just could not find the right fit for us. We wanted a large dog, but needed someone mellow. I was really leaning toward a girl and older. We just went through the puppy period with our Cheweenie, Hunter, and I did not want to start over from scratch.

We visited the shelter three weekends ago and didn't find our fit. But, something made me drag the boys back the very next day. That is when I saw her. My Pickles.


She is just a doll! Mellow, sweet, snuggly...60lbs of black lab love with a fluffy coat and big brown eyes. They said she was about three years old (a vet visit the next day confirmed her closer to five or six years old, fine by us!). They said she was brought in by someone that claimed her to have just walked up to their door. Maybe. But, she does not have the spirit of a dog that would run away.

The vet said it does not look like she had ever been walked. She was 10lbs overweight and had no wear on her hips at all. She is great on a leash, though! We were given the go ahead to walk (and some antibiotics for kennel cough - poor baby!). In an effort to take the weight off I have been monitoring how much she eats. We divided her portions up into two meals a day so that she can eat with our skinny, Hunter. And the goal is two good walks a day. She loves it...and adores a car ride. Sometimes we can't get her out of the car. It is the only disobedience that we have seen in her so far. She is getting better now that she realizes she will be getting a lot of car rides around here.

This evening we took a little walk in a nearby neighborhood. I snapped some pics! Everyone says she is looking a million times better, healthier, stronger and thinner around the middle ;).

We set out down the block...

Pickles wore her leopard and blue bow this evening. 

 It is so awesome that these are popping up around the city!
Moon popped out while we were walking.

 Mama Duck had a big family this year. 
 More walking. 
 Kissy Break
 Finally the shade! This made Pickles very happy. 
 Happy enough to stop and smell some flowers. 

Time to go home. <3 My baby girl. 

Thursday, June 28, 2012

The One Day Toddler Room Makeover

I have procrastinated for a year. I have wanted to paint a mural on Izzys wall and even penciled it out months and months ago. I bought the paint shortly after that and it has sat in my craftroom every since. But, yesterday at naptime I just went for it...

Before:


*hangs head* Aweful, I know. But, in my defense he doesn't sleep in here and rarely plays in here. Its more of an extension of my craft shop and a place we hold Izzys clothes.

One naptime + 10 painty fingers later (heheh weekly nail?):


After naptime:


Then he went to bed for the night and I painted his furniture to match: 


I painted his entertainment center, his bed and the shelves on the wall to the far left. I am really happy with how it turned out. Not bad for one day! Now I get to go choose some fabric for his bedding and curtains. 


Swap Package

I love to crochet...but I can only crochet so many things for my boys. So, swaps are amazing. You get a partner and send yarn related and handmade gifts all through the year. I received a beautiful package just the other day! I am so in love. The bag! the lavender! It could not be better suited to me!

Its the worst picture ever taken of the best stuff!!! Love the colors. The bag is purple, fushia and teal green. The little baggies are filled with lavender from a nearby farm. She sent simply soft and cotton yarn. There are two packs of quilting cottong...adorable prints :) A lovely lavender (Its my favorite) candle. She also sent the cutest little bottles of red and purple buttons and a lovely card. I could not be more pleased!

Wednesday, June 27, 2012

I made this purple rhinestone adorned bow holder for my dog (who gets to be the daughter I never had). She looks so pretty in the bows and flowers I am making her! 


I used the typical unfinished door hanger that you can find in any craftstore. I painted it a special mix of purple and white acrylic patin. I used rhinestone letter stickers I had from making my "Crunk Cup" last year. Then I decorated it with glitter glue and more rhinestone stickers. For the hanging ribbons I took account that I will not be hanging anything too heavy and took advantage of that to save time. I used chiffon sheer 3/4" ribbon, cut two 2 foot lengths and just glued it on the back of the holder with plain craft glue. If it needed to be stronger I would have hot glue'd it. :)

Still have some bows in the making...I need to attach the alligator clips that I just bought. 


I got the idea for the fabric flower in a book that I won online! I was so excited and will be reviewing it very soon once I complete a few more projects. It is called "Mend It Better"


Personalized Wool Soakers

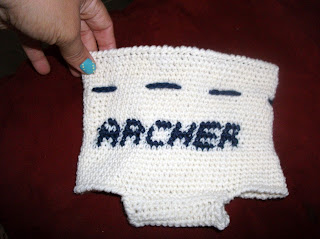
Last nights project was a quick and simple one. I did not use a pattern and really hopes it fits nicely (I'll update)...but its a little wool soaker for baby Archer. He is due to arrive on or before 3 weeks from now!!! 


Here is a brief rundown on how I made it. Please let me know if any of it any of it seems botched. :) I am always open to suggestions, too. I did not cloth diaper my boys so I am not very familiar with this. More than anything its for adorable pictures. I hope she gets some use out of it, too. But, I just cannot wait to see it on him.


F Hook
Sensations Wool Yarn (thinnish, has the feel of sport weight yarn...any thicker and I cant do the lettering)
ch 75,
1-27) sc in each stitch for 27 rows (letters were done in rows 13-17) (working in the round) (75)
28) sc in next 16 stitches, turn (16)
29) decrease1, sc 12, decrease1 turn (14)
30-42) sc across (14) turn
43) Increase1, sc 12, increase1 (16)

Sew or slip stitch row 43 to the center of the opposite side of row 27 to form what looks like a soaker. fasten off.
SC around the waistband and legs to finish.
With same or complimenting color ch 75, fasten off. 5


Weekly Nail

Turquoise with random buttery yellow polka dots. I used a toothpick.


I am loving it! Had a little chip on my index finger at the waterpark after hours and of lazing in the "Lazy River" at Soak City with a toddler on my tummy. But, it is a quick fix. There is something very magical about Wet N Wilds "I Need a Refresh-Mint". Just looking at it makes me extremely happy!

Monday, June 25, 2012

Make My Own Laundry Detergent

I love to keep busy and when I found out that I was stuck at home because I sent all of the cards off to work with my husband this morning I felt a little stuck. My to-do list was centered outside of the home. But, it turned into a really nice homebody kind of day!

I made detergent...


I adapted a simple recipe after making Mama Duggars recipe a few times. By adapted I mean that I have pushed the bill making it lazier and lazier each time. I am just waiting for this recipe to fail somehow because of my laziness. But no...as laidback as I have gotten about it the stuff just keeps impressing me with its cleaning abilities and fresh scent. I use the same amount of it as I would any other detergent. I fill it to the line on the cap.

Stock Pot
6 c water
1/4 of a bar of Fels Naptha grated as small as your grater will grate.  (Walmart)
1/2 c of borax (Walmart)
1/2 c Arm & Hammer Washing Soda (I have seen it at some Walmarts...but I have to go to Ace Hardware for mine locally. Fortunately that box has lasted for over a year of making this recipe)
About 3 large empty detergent bottles
Warm Tap Water to fill up the bottles after you have added your detergent concentrate.

Put the water in the pot, turn on the heat medium/high. Add the grated soap. Stir until the soap is dissolved. Let it come almost to a boil. Turn off the heat. Add the borax and the washing soda to the pot and stir until it is mixed.

I then add it to my bottles using a glass measuring cup.

Top off the bottles with warm water straight from the tap. Replace the cap and give it a little shake to mix. Ready to use!

Some tips I have learned along the way...

1) I keep my bar of Fels Naptha out of the bag and package...the more dried out the get the easier it is to grate.

2) Saving money is great...but we use this because it is the best detergent I have found on my husbands CRAZY dirty work clothes. It doesn't get them back to perfect, but its the best they have come out.

3) I don't let it cure. And my detergent can be lumpy. But, the lumps have never given me an issue. But, *whines* the curing took over a day.

4) Give the detergent a little shake before you add it to your washer.

5) Some people use a bucket. I found it messy and the ladel kept slipping to the bottom of the bucket. Lots of dripping. I really love having my old detergent bottles to refill with this recipe. It makes ALOT.

6) We have the largest washer and at full capacity I still just use a cap full like I would regular detergent. Works fine.

7) We love the smell of this stuff! Without anything added. Felz Naptha is very pleasant and clean smelling. Not flowery, manly, musky, springy...just nice and clean.

8) If you are looking for a laundry booster for tougher than average load...just adding some Borax is a GREAT idea.


Ninja Kitty approves of the detergent 100%. She has been asleep on this sheet in the breeze of the window all afternoon.


Then I painted! I am loving reteaching my hands how to paint! I like to find word art I love on Pinterest and copying it. Its a great way to retrain and resteady my hand! Naptime Fun!


The Crocheted Hobo Bag!

I love this pattern. I have made four of them and the people who you give them to always love them! I always tweak the pattern in one way or another. This time I made it slightly thinner than it was called for. This one was royal blue (I used I Love This Yarn...it takes about 3/4 of a skein). I lined it with a soft white muslin to show off the crochet stitches and help it to maintain its shape. I wanted a pop of color so I used a limey-green ribbon. But the ribbon is interchangeable.

Here it is!


And here is a link to the lovely person that shared the pattern with the world!


Saturday, June 16, 2012

Nail Guides


I used nail guides for the first time today...I had to have them after reading about them on The Dainty Squid whose blog and style I love...did I mention she is adorable!? But she mentioned nail guides. They look like this...

Thank you Born Pretty! :)

For those of us that do not like to have to choose just one nailpolish color for the week and refuse to be forced to these are a dream come true. Freehand works, but this is alot cleaner looking. The Dainty Squid is a pro with them. This was my first time and I know that next time I will be looking top notch, too. Because I figured out a few things that will help me!

Next time I use Nail Guides I will...

1) Have a pair of tweezers with me to remove the stickers from my nails so that I do not ruin the tips trying to take the stickers off. 

2. Have an orangewood stick with me to press down the corners of the nail guides into the crevices on the edges of my fingernails. 

Aside from not having these items I was golden. But the edges of my nails are not as defined as I would like and the tips are a little gloppy because I used my fingertips to remove the stickers before the edges were dry. I know better than to wait for the polish to dry before removing the stickers and then applying topcoat.

Next time I will be ready!!!

The Colors:
Wet 'N Wild "Through the Grapevine"
Essence Colour & Go "Walk on Air"
Sally Hansen Insta Dri


Friday, June 15, 2012

Hungry - Protein Pumpkin Pudding

Alot of times I am hungry after dinner. Portion control will do that for you...

tonight dinner was a pork chop and carrots. The guys had au graten potatoes. So two hours later at 8:30 I am hungry and it is about protein shake time. But, I want more.

And I love pumpkin. So the following recipe has made it to my list of "regulars". I make sure to have the ingredients on-hand. It is good hot or cold. Just microwave the pumpkin for a minute or two if you want warm pudding. Which is what I had tonight.

Ingredients:

1/3 cup of milk (any type of milk will work...we just want to dilute the protein)
1 scoop of vanilla protein powder (I use BodyTech from Vitamin Shoppe because I am cheap)
1/2 of the big can of pumpkin
1 teaspoon of pumpkin pie spice
Walnuts for garnish (optional)


Whisk the milk and protein powder (I use my electric handmixer), when its smooth poor it into the warm or cold pudding, add spice and mix until it is smooth. It is heavenly and packed with protein and vitamins. Sprinkle walnuts on top if you like. 

Workwise I am working on a pattern for a lightweight newborn sized diaper soaker. Pattern to come! :)


My Mug Of Chocolate

There are many recipes for Chocolate Mugs out there. Lets face it...an instant chocolate treat is going to be something that gets lots of attention. Here is my recipe...its a bit of a hybrid from the many I have seen online. It is a little bigger than most, too. I use a big mug. :)

Large Mug (12-16oz) with a spritz of nonstick cooking spray inside
3T whole wheat flour
3T splenda
3T cocoa powder
a splash of vanilla
1/2 t of baking powder

mix that all together with a fork.

Add 5T of milk (any kind works cow, hemp, rice, almond....) and stir until it is smooth.

Microwave for one minute, sprinkle a few chocolate chips on top and YUM!


Thursday, June 14, 2012

Adopted the Most WONDERFUL Dog

This is Pickles! The newest member of our family. She is 60lbs of the most well-behaved black lab puppy that you could ever hope to meet. She is 3 years old and according to the pound we adopted from she was reported to have just wandered up to someones house. Aside from a little kennel cough she is a perfect fit! Love her!!!


Monday, June 11, 2012

Lazy Weekends

No new pictures. No finished projects. I feel like SUCH a bump on a log.

It was my teens' birthday weekend so I basically just ran around doing whatever he wanted...we played ALOT of video games (we are a Final Fantasy 14 family). Lots of cupcakes and BBQ and laughing.

Tomorrow is back to business though...

Happy Sunday night <3


Friday, June 8, 2012

Giddy Moment

I live for moments in Barnes and Noble, browsing while the baby naps in the stroller. *smiley sigh*

I got a coconut mocha with chocolate whipped cream...and surprisingly it made the moment even better!!!


I went with hot pink and steel grey for my nails this week. I got new nail guides for this weeks manicure in the mail yesterday...

Thursday, June 7, 2012

Sun Hat

I am making a pattern from CAPs Crochet and Crafts to make myself a bucket hat for the summer. I am going to make it in royal blue Impeccable yarn by Loops and Threads. I really like Impeccable yarn...it is comparable to Vanna yarn but denser. Vanna is great for knitters, I hear. But, my knots tend to smoosh a bit when I use it. I still do sometimes if I fall in love with a color. Vanna has a really pretty pink.

Back to my sun hat! It took about two hours of frequently interrupted crochet time. The shells were very easy, but I opted to only do three rows. That made plenty of brim for me.


CAPs also had a great hat sizing tip. I rarely bring the math into my sizing. I tend to make a rectangle swatch, measure it and plan the number of stitches from that. But, I like her method too...

"Hat Sizing Tip: Measure around head just above eyebrows (keeping tape level) and divide that measurement by 3.1416. The result is the width your crown circle needs to be before continuing to Rnd 9. Example, head measures 22” around; 22 ÷ 3.1416 = 7.0028; Crown circle needs to be 7”. "


Thanks Cathy! It doesn't look like she has blogged for a bit, but I am adding her to my bloglovin' just in case. She created some really cute and functional patterns.

Wednesday, June 6, 2012

On my to-do list

As part of a summer linky party I am in I was nudged to think of my summer goals.

I want to go to the beach every Tuesday.
I want to go to the preschool play group I was invited to every Friday.
I want to make a quilt like the one I am in love with in so many of pics posted by SmileandWave


Make Turquoise and White Ripple Afghan
Create a pattern for a 4th of July cloche (before the 4th, hopefully LOL).
Get the stats I need to open an ebay store.
Buy an Iphone 4.
Go to LOTS of estate sales.
Make lots of Dinners and Deserts from Pinterest.
Create photo wall of pics and wordart...black frames.

Tuesday, June 5, 2012

At the Mall

Today we went to the mall to get some power-walking done. I hit an impressive number of steps and had gone over my daily 10K by 2 o'clock!

Here are some things I ran across that were just too cute! I always snap pics when I go to walk and not to shop. That way I don't fret too much.


I love coral and teal...I will need this color combination to show up on me in the near future!

This was so cute at Nordstrom...its a plain cotton stretch camisole with a chiffon scarf connect at the straps. I wonder if I could make something like this for myself?

  
Love this bright cheery bedding set at Macys...but mostly love the "Live Laugh Love" pillow. I see some applique in my future.         

The mall is so full of inspiration! And frozen yogurt for lunch!!!!! mmm...chocolate with coffee flavors.


Beach Snacks - Caramel Apple Empanandas

A post on Kandeeland that featured her yummy Rice Krispy treat got me thinking about how it relates to my topic of the week. Preparing for this summers "Beach Day Tuesdays". I have a few standby snacks that I buy and prepare for beach day.

My beach bag is not complete with raisins, apple juice boxes, baggies of almonds, bananas, nut butter sandwiches and the basics...but we do have one item that is unique unto me. Apple caramel empanades.

(Just in case: Empanadas are little fried pies)

They are perfect beach and pool food. Make them small, put a stick in them and pop them into a quart sized ziploc and you just grab it on your way to the beach. The pie crust on the outside keeps the sand out, the stick makes them great for dirty hands, and there is something about caramel when you are in the salty air.

Fast and Easy Caramel Apple Empanadas

crust
1 containers of refrigerator biscuits...the plain little ones work best for making little treats.

filling
3 apples peeled and chopped into 1/2" cubes
1 cup of water
2 cups of sugar
1 teaspoon cinnamon
1 teaspoon lemon juice
1/4 cup raisins

frying
sugar for sprinkling
vegetable oil, lard, coconut oil...whatever oil you like to fry with.

Directions

Open the biscuits, and flatten each of them out (I do it on wax paper). Make them a nice 4" circle but the shape does not have to be perfect. The entire feel of this recipe is easy breezy.

Put one cup of water in the microwave in a small bowl and microwave it for 2 minutes. When it comes out put the raisins inside to plump them. You can add more raisins if you like. Depends on how much you like cooked raisins. When they look plump drain them and set them aside.

Bring one cup of water to boil. Add the apples and cinnamon. Boil them until soft and add more water if it starts to dry up. Drain them and set them aside with the raisins.

Bring one cup of water, 2 cups of sugar and 1 teaspoon of lemon juice to boil over medium heat until be turns caramel brown. It doesn't take long at all. You can use a candy thermometer and take it to 335 degrees, but I just eyeball it for the right color. When it does reduce heat to low (if you turn off the heat it will harden and be inconvenient to say the least)...add the apples and raisins.

side note: you can get creative here...as long as its not watery you can add virtually ANYTHING. I would love to hear what others have added!).

Start heating up 1" of oil in a frying pan.

Assemble by putting a spoonful of filling in the middle of each biscuit. With my fingers I dampen the edges with water, milk or egg. Whatever I have has always worked well. Fold over and seal. You can make hashmarks with a fork to ensure its sealed.

Toss in the oil and turn when brown. Remove when the second side is brown. Sprinkle with sugar immediately so it sticks. Let cool. Then you can put them in a baggie and refrigerate. I love them cold! They are good warm with ice cream, too.

If you are trying to be healthier...
use a whole wheat biscuit dough.
use only apples and raisins...and perhaps half the sugar.
bake them in the oven at 375 degrees until lightly browned.

But made this way they don't hold up as prettily at the beach...still VERY tasty though. :)


DIY meets repurposing

I am a sucker for a DIY project...and when I stopped using paper towels and began using old rags I jumped on the bandwagon of creating my own "paper towels" pretty quickly after seeing a post about it. Same day...same morning, actually. Thank you Cottontail Babies and Pinterest! I am not sorry. But, even though I jumped in with both feet I have been procrastinating on a HUGE step in the cloth towel transition. A wet bag. Seriously...its nasty. Soggy towels after every meal add up quickly to sit in the designated spot of the day waiting for the next mornings laundry.

I cant keep them on my DIY'd counters...the paint will peel.

I cant keep them anywhere the baby would reach them.

I cant put them in the laundry basket...gross.

But, I day after day I procrastinated about making a wet bag to hold them. I think its the zipper. As crafty as I feel, I still haven't attached a zipper. I have quite the beautiful zipper collection. But I am an elastic girl, fold over yoga waists are my friend.

So, being green is important and so is being clean. But, the most important thing of all you can contribute to the world is being nice to yourself. I don't want to make a wet bag...so I am repurposing!


My Barbie lunchbox now has a home on the microwave and a new job! 


I get to be compassionate to myself and not force myself to craft something half-heartedly and I get to look at my Barbie lunchbox everyday now!

It makes me smile. It originally housed my manual breast pump when I was working after having the Izzy. He went to the office with me...but a few times daddy wanted to keep him home with him.

Monday, June 4, 2012

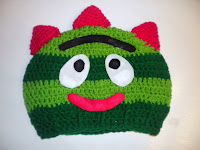
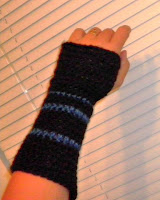
Some things I have crocheted...

Here is just some pics of things that I have crocheted in the last couple of years. I really love to crochet <3 


Featured Post

Exploring Local Creativity at the Texas State Fair